How to Cut Accurate Miters
Why four 45-degree cuts never close, how to find your saw's real error instead of trusting the detent, and the two cuts that fix a gap you can already see.
How this is funded: we earn a commission if you buy through our links, at no extra cost to you. It never changes which tool we recommend, and we’ll tell you plainly when to skip one. Full disclosure.
A mitered corner is the least forgiving joint a beginner attempts, and the reason is arithmetic rather than skill. A picture frame has four corners and eight mitered faces. If your saw cuts 45.5 degrees instead of 45, that half-degree appears eight times, and the frame has to absorb four degrees of error somewhere. It absorbs it as a gap you can see from across the room.
That multiplication is the whole problem, and it is also the solution: the same amplification that makes miters hard makes it very easy to measure how wrong your saw is. Cut four pieces, assemble them, and a tiny error becomes an obvious one.
The first thing to accept: the scale on your saw is a suggestion
Every miter saw has positive stops — detents — at the common angles, and they feel authoritative. They are a factory setting that survived shipping on a pallet, and they are frequently a fraction of a degree out. There is nothing wrong with the saw; there is something wrong with trusting a number stamped on a casting.
Two checks, in order. First, check zero. Unplug the saw, drop the blade, and stand a square between the fence and the blade plate— the flat steel body, not a tooth, because teeth are set alternately outward and will give you a reading that changes depending which one you touch. Any light between the square and the plate at zero is error present in every cut the saw makes, miter or not. Most saws have an adjustment for this; the manual will show it.
Also check that your square is square, which sounds like a joke and is not. Draw a line across a board with the square, flip the square over, and draw again from the same point. If the two lines do not lie on top of each other, the square is the problem — the squares roundup covers the test in full.
Second: the four-piece test
Set the saw to the 45-degree detent and cut four pieces of scrap, all the same length, mitered at both ends. Lay them on a flat surface as a square frame and push the corners together.
- Gaps on the outside of the corners— the angle is slightly more than 45 degrees.
- Gaps on the inside— slightly less than 45.
- No gaps, but the frame is not square— the angle is right and your part lengths differ. That is a stop-block problem, not an angle problem, and it is dealt with below.
Now nudge the saw a hair off the detent in the correcting direction, lock the table, and cut the test again. When the frame closes, do not touch that settinguntil the project is cut. Many saws will not even show the adjustment on the scale — you are setting it by result, not by number, which is the correct way round.
Why four 45s never add up on real wood
Even with a perfectly calibrated saw, three physical things conspire against a mitered frame, and knowing them is what separates a frustrating afternoon from a predictable one.
The workpiece moves during the cut
At 45 degrees the blade is pushing the stock sideways along the fence as well as down into it. A board held by hand creeps a fraction of a degree during the cut, every time, and that creep is indistinguishable from a saw error. The fix is a clamp — most saws have a hold-down, and a small one-handed bar clamp works where the saw’s own clamp does not reach. This single habit fixes more miter problems than any adjustment.
The stock is not straight or not square
A miter joint assumes the two pieces meet at a known angle, which assumes each piece has a flat reference face against the table and a straight edge against the fence. Bowed or twisted stock will give you a different angle at every corner no matter how well the saw is set. Check your material before you blame the machine — how to square up a board covers getting a reliable reference face, and how to buy lumber at the home center covers rejecting the twisted ones in the rack.
Wood moves after the cut
A mitered corner is end grain glued to end grain at an angle, and the two pieces expand and contract across their width with humidity. A frame that closed perfectly in a damp garage in August can open slightly in a dry room in January. This is real, it is unavoidable, and it is the honest argument for keeping mitered frames narrow and for not panicking about a hairline that appears months later. The mechanism is in wood movement explained.
What to look for: the three things that actually decide the cut
If your miters are not closing, the fixes in order of effect are a fine blade, a trustworthy square, and a clamp— and only then a different saw.
The blade is the biggest single improvement.A miter cut is a long, shallow crosscut across the grain on a face that is about to be glued and looked at. Tear-out where the teeth exit the wood shows up exactly on the corner of the joint, which is the worst possible place for it. An 80-tooth crosscut blade leaves a surface that needs no sanding before glue-up; the 24-tooth blade that came with the saw is a framing blade and will leave a ragged edge no amount of technique recovers. Match the blade diameter to your saw — a 10-inch blade on a 10-inch saw — and see the saw blade roundup for the full tooth-count logic.
The square has to be more accurate than the saw or you are calibrating noise. A cast combination square with a 12-inch rule is enough, and it does double duty: the head has a 45-degree face for checking the miter directly, and the rule is long enough to read across a blade plate.
A saw you can calibrate beats a saw with more features.If you do not own one yet, the thing to look for is a solid fence, detents that click positively into place rather than vaguely, and a build that holds its setting — not a laser, and not a slide you will rarely use on furniture-scale parts. The comparison is in the miter saw roundup.
| Tool | Why you need it | Price |
|---|---|---|
 | A 10-inch compound saw that holds calibration — the thing that matters for miters, far more than a laser or a slide. | $111.95 |
 | Eighty fine teeth on a 10-inch blade. The single biggest improvement to a miter cut: no tear-out at the corner, no sanding before glue-up. | $64.99 |
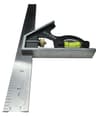 | What you calibrate the saw against. The head gives you 90 and 45 degrees, and the 12-inch rule reads across the blade plate. | $11.98 |
 | One-handed, so you can hold the stock against the fence and clamp it in one motion. Stops the creep that reads as an angle error. | $32.99 |
| Starter kit subtotal | $221.91 | |
Live Amazon prices as of October 6, 2026; they change, and we don’t display stale numbers — a tool with no live price shows “Check price” and is left out of the subtotal. #ad How we’re funded.
Cutting the parts so errors cancel instead of adding
There is a technique that works even on a saw you have not calibrated, and it is worth knowing because it is how professionals get away with imperfect machines.
- Cut every part of the same length against a stop block, never by measuring each one. Two opposite sides of a frame must match each other exactly; whether they match the drawing is almost irrelevant. A stop block guarantees the first thing; a tape measure guarantees neither.
- Cut opposing pieces consecutively, without changing anything between them. Whatever error exists is then identical on both pieces, and an identical error on two halves of a corner partly cancels.
- Cut all the left-hand miters, then all the right-hand ones. Fewer setting changes, fewer chances for something to shift.
- Label the parts as they come off the saw. Four identical mitered sticks become unidentifiable in about thirty seconds, and the one you cut slightly short will end up opposite the one you cut correctly.
- Dry-fit the whole frame before any glue, on a flat surface, with a band clamp or masking tape pulling it together. This is the last point at which a correction is cheap.
Closing a gap you can already see
Suppose the frame is cut, mostly closed, and one corner shows a hairline. Three real fixes, in order of how much wood they remove:
- Burnish it. With the joint clamped, rub the outside corner firmly with the back of a chisel or any smooth hard steel. This rolls a small amount of wood across the gap and genuinely closes a hairline. It is a legitimate trade technique, not a cheat.
- Shave one face. A block plane or a sharp chisel taking a paper-thin pass off one mitered face adjusts the angle by a fraction of a degree, which is exactly the amount you need and exactly the amount no powered saw can remove. This is what a shooting board does in a more controlled way, and it is the single best argument for owning a block plane.
- Re-cut both faces. The honest answer when the gap is not hairline. Take the same whisker off both halves so the frame stays square.
What not to do is fill it. Wood filler in a mitered corner takes finish differently from the wood around it, so a filled miter is invisible for about as long as it takes the first coat to dry and visible permanently thereafter.
And reinforce it, because a miter is a weak joint
End grain to end grain is the weakest glue surface in woodworking — the fibres are straws, and glue soaks into them without bridging across. A mitered frame that will be handled wants help: a brad or two through each corner, a spline or biscuit across the joint, or a corner key. For a picture frame a couple of 18-gauge brads is the usual answer, which is one of the jobs a brad nailer is genuinely best at — see brad nailer vs finish nailer for why the smaller gauge is right here, and joinery vs fastening for the strength argument in general.
One final point of perspective. Mitered corners are the joint beginners judge themselves hardest on, and they are genuinely difficult — the geometry amplifies every error by eight. The sequence that works is boring and reliable: check the square, check zero, cut the four-piece test, adjust off the detent, fit a fine blade, clamp the work, cut to a stop block, and dry-fit before glue. Done in that order it stops being luck. Done in any other order it stays luck forever.
One safety note. Power tools deserve respect, not fear. Read the manual, keep the guards on, wear ANSI-rated eye protection every time, and never rush a cut. When something feels wrong, stop and reset — there is no deadline in a home shop.
Frequently asked questions
Why are my miter joints not closing?
Almost always because the saw is not cutting the angle its scale says, and the error is multiplied. A four-sided frame contains eight mitered faces, so a half-degree error at the saw becomes a four-degree gap around the frame — easily visible. Check the blade against the fence with a reliable square at the zero setting, then cut a four-piece test frame and adjust slightly off the detent until it closes.
How do you cut a perfect 45-degree angle in wood?
Do not trust the 45-degree detent. Set the saw to it, cut four test pieces from scrap, and assemble them as a square frame on a flat surface. If the corners open on the outside the angle is slightly over 45, and if they open on the inside it is slightly under. Nudge the saw a fraction off the detent, lock it, and re-test — then cut your real parts without touching the setting again.
Can you cut accurate miters without a miter saw?
Yes. A miter box with a backsaw cuts genuinely accurate miters because the angle is fixed in the box rather than set by you, and a shooting board with a hand plane will take a sawn miter to a perfect fit — that is how miters were cut before powered saws existed. A circular saw with a clamped guide also works for wide stock. What is hard is cutting them accurately freehand, with any tool.
Why does one side of my miter look longer than the other?
Length error, not angle error — the two pieces are not the same length, so the joint closes but the frame is not square. The fix is a stop block: set it once and cut every part of that length against it, instead of measuring and marking each one. Two opposite sides of a frame must match each other exactly; whether they match the drawing matters far less.
How do you fix a gap in a mitered corner?
If the gap is small, close it mechanically: clamp the joint and burnish the outside corner with a smooth hard object, which rolls a little wood across the gap, or slice a paper-thin shaving off one face with a block plane or a chisel and re-fit. For anything bigger, re-cut both faces slightly — a mitered corner with filler in it stays visible forever, because the filler takes finish differently from the wood.
What blade should I use for cutting miters?
A high-tooth-count crosscut blade — around 80 teeth on a 10-inch saw. A miter cut is a long, shallow crosscut across the grain on a face that will be glued and seen, so tear-out at the exit of the cut shows up as a ragged corner. Fine teeth leave a surface that needs no sanding before glue-up. The 24-tooth blade supplied with most saws is a framing blade and the wrong tool for this job.
Sources
- OSHA — Woodworking eTool — OSHA guidance on woodworking hazards, guarding and safe work practices (accessed July 24, 2026)
- OSHA — 1910.213, Woodworking machinery requirements — The federal standard for guarding on saws, routers and other woodworking machines (accessed July 24, 2026)
- USDA Forest Products Laboratory — Wood Handbook (FPL-GTR-190) — The U.S. government reference on wood as an engineering material (accessed July 24, 2026)
- American Academy of Ophthalmology — Home workshop eye safety — AAO guidance on protecting your eyes with power and hand tools at home (accessed July 24, 2026)
Keep reading
Best miter saw for beginners
Five saws compared on capacity, slide versus chop, and the fence and detents that decide accuracy.
See the picksMiter saw vs circular saw
Which to buy first, and the jobs each one is genuinely wrong for.
Read the comparisonBest saw blades for beginners
Tooth counts, grinds and why the blade in the box is almost never the right one.
Compare the bladesWood joints explained
Where a miter sits among the joints — what it is good at, and why it is weak in end grain.
Read the guideBest squares for beginners
How to check a square is actually square before you trust it to calibrate a saw.
See the squares