How to Start Woodworking
A first-90-days plan for an empty garage: what to buy in week one, what to build, and the order that stops beginners quitting.
How this is funded: we earn a commission if you buy through our links, at no extra cost to you. It never changes which tool we recommend, and we’ll tell you plainly when to skip one. Full disclosure.
Almost everybody who wants to start woodworking gets stuck in the same place. They watch a few videos, open a shopping page, see a table saw, a jointer, a planer, a dust collector and a bandsaw, add it up, and quietly decide to start later. Later never arrives.
The trap is that the internet shows you a mature shop and calls it a starting point. It is not. A first shop is a flat surface, a way to hold wood still, something sharp, and a plan. This page is that plan, laid out across ninety days, with the buying split into three waves so you never pay for a tool before you have felt the need for it.
Before anything: the one decision that matters
Decide what you want to make, roughly. Not a specific project — just a direction. Boxes and small furniture, shop fittings and shelving, or outdoor things like planters and benches. It matters because those three paths need different tools in a different order, and because “I want to do woodworking” is not a goal you can act on this weekend.
If you genuinely do not know, pick shop fittings. Building the things your shop needs — a bench, a shelf, a saw guide, a stool — means every early mistake ends up somewhere it does not matter, and you finish with a shop instead of a pile of practice pieces.
Days 1–7: buy the small kit, cut some wood
Wave one is deliberately small. Seven items, none of them exciting, all of them used on every project you will ever build.
| Tool | Why you need it | Price |
|---|---|---|
 | Everything starts here. One tape, used for the whole project — mixing two tapes introduces errors you cannot find later. | $19.32 |
 | Marks square lines, checks square cuts, sets depths. The cheapest tool that instantly makes work look deliberate. | $11.98 |
 | A pull saw cuts on the pull stroke, so it does not buckle and it is far easier to start a straight cut with. | $42.80 |
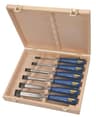 | Six sizes that clean up every joint you cut. Struck-capable handles, so the set grows with you. | $69.99 |
 | Four clamps is the realistic minimum for a first glue-up. You will want more; start here. | $36.99 |
 | Chisels arrive blunt. This is the difference between a chisel that cuts and one that bruises wood. | $15.99 |
 | Worn every session from day one, so it becomes automatic before you own anything with a motor. | $12.59 |
| Starter kit subtotal | $209.66 | |
Live Amazon prices as of October 21, 2026; they change, and we don’t display stale numbers — a tool with no live price shows “Check price” and is left out of the subtotal. #ad How we’re funded.
Then do the thing almost nobody does: go and cut some wood. Buy two or three cheap softwood boards, take them home, and spend an hour cutting them to length. Mark a line with the square, cut on the waste side of it, check the result against the square, and do it again. Twenty cuts will teach you more about saws than twenty videos.
Expect the first five to be bad. The line wanders, the cut is not square in both directions, and the saw jumps when you start. That is normal and it goes away with repetition, not with a better saw.
Days 8–30: sharpening, then a bench
Two things happen this month, and the first is the one beginners skip.
Learn to sharpen
A brand-new chisel is not sharp. It is ground, but the back is not flat and the edge is not honed, and until you fix both it will crush fibers instead of slicing them. Set aside one evening, follow our chisel sharpening guide, and get one chisel genuinely sharp — sharp enough to shave a curl off the end grain of a scrap.
That evening changes everything afterwards. Nearly every “my tools are not good enough” complaint from a beginner is a dull edge. It is also the cheapest upgrade available: the same chisel, thirty minutes later, doing a job it could not do before.
Build a bench, or make one work
You cannot do controlled work on a wobbling surface. You do not need a traditional joiner’s bench — you need something heavy enough not to move, flat enough to reference against, and at roughly hip height. Our simple workbench build takes a weekend and construction lumber. If a weekend is not available, a portable folding workbench will get you started, and the workholding guide explains how to actually hold wood still on whatever you end up with.
Build the bench with the tools you already own. It is the ideal first project precisely because nobody looks closely at a workbench, so every gap you cut is practice rather than failure.
Days 31–60: joints, and the second wave of tools
By now you can cut to a line and your chisels are sharp. Time to join two pieces of wood together on purpose.
Learn four joints, in this order: the edge-glued butt joint (for panels), the rabbet (for boxes), the dado (for shelves) and the mortise and tenon (for anything with legs). Our wood joints guide explains what each one is for and how strong it really is. Cut each on scrap first. A joint that fits is a specific, learnable skill and not a talent.
This is also when the second wave of tools earns its place, because you now know what is slow. For most people that is two things: ripping boards to width and sanding.
If you are doing all of this with no class and nobody to check your work, how to learn woodworking on your own covers the skill order and the self-checks that replace a teacher looking over your shoulder.
- A drill/driver. The most-used power tool in any shop, and the safest to learn on. Our cordless drill picks cover the ones worth buying, and the battery platform guide explains the decision underneath it.
- A circular saw. Cheaper, safer and more space-efficient than a table saw, and with a clamped straightedge it cuts sheet goods accurately — see how to cut plywood with a circular saw.
- A random orbital sander. Sanding by hand is genuinely miserable past a certain size. The sander guide names the one to buy, and how to sand wood properly explains why your finish still shows swirls.
Notice what is not on that list: a table saw, a router, a miter saw, a planer. All useful eventually, none needed yet. Our guide to tools you don’t need yet covers why, and do you need a planer or a jointer answers the machine question that stops most people.
Days 61–90: build something you will keep
Now build something for the house rather than the shop. A cutting board, a small shelf, a stool, a box. Something with a joint in it, a finish on it, and somebody who will see it.
Two reasons. First, finishing is a skill of its own and it is the one that makes the difference between “you made that?” and “oh, nice” — work through how to apply a wood finish before you start rather than after. Second, a finished object that lives in the house is what keeps you going through the next three months. A pile of practice cuts is not.
If you want a specific first build, how to make a cutting board walks the whole thing: choosing boards, the glue-up, flattening it without a planer and a food-safe finish.
The five things that make beginners quit
All five are avoidable and none of them is about talent.
- Buying everything at once. A garage full of unfamiliar tools is paralyzing, and half of them turn out to be wrong for what you actually make. Buy in waves, driven by a job that is currently annoying you.
- Working with dull tools. Dull tools make wood tear, require force, and feel like a personal failure. Sharpen first, blame yourself second.
- Starting with a hard project. A dining table as project one is four months of frustration. A shelf is one afternoon and a win.
- Measuring instead of transferring. Every measurement is a chance to be wrong. Where you can, hold the part against the work and mark directly — our marking and measuring guide covers this properly.
- Working somewhere unpleasant. A cold, dark, cluttered garage does not get visited. Good light, a clear bench and a workable temperature do more for your output than any tool.
What ninety days actually gets you
Not mastery. What you get is a shop that works, tools you know how to maintain, four joints you can cut, and two or three objects that exist in the world because you made them. That is the point at which woodworking stops being a thing you are thinking about starting and becomes a thing you do.
From there, everything is just more of the same: a new joint, a better finish, a bigger project. The hard part was the first weekend, and it is much smaller than it looks from outside.
Next step, if you want the full shopping list with live prices: the best woodworking tools for beginners roundup. If you want to know the total first, read how much it costs to start woodworking.
Frequently asked questions
What should I buy first to start woodworking?
A tape measure, a combination square, a saw, a set of chisels, four clamps, a sharpening stone and eye protection. That is the whole week-one list and it comes in comfortably under the price of one cordless drill kit. Buy a drill next, not first — you will be surprised how much you can build without one.
How long does it take to get good at woodworking?
You can build something genuinely useful in your first weekend. Cutting square and consistent takes about three months of regular practice. Furniture-quality joinery takes a couple of years. The good news is that the gap between 'total beginner' and 'can build a shelf that does not wobble' is measured in hours, not years — almost everyone quits before finding that out.
Do I need a workshop to start woodworking?
No. A corner of a garage, a folding workbench and a plastic tub of tools is a working shop. You need a flat surface at roughly hip height, somewhere to hold the wood still, and enough space to swing your arms. A whole garage bay is a luxury, not a requirement.
Is woodworking expensive to start?
Starting is cheap; accumulating is expensive. A functional hand-tool kit costs less than a night out for two. What costs money is buying tools before you know whether you will use them — which is why this plan buys in three waves rather than one shopping trip.
Should I learn hand tools or power tools first?
Hand tools, for about a month. They are quieter, cheaper, far more forgiving of mistakes, and they teach you how wood actually behaves — which way it splits, what a sharp edge feels like, why a cut wanders. Then add power tools for the jobs that are genuinely tedious by hand: ripping long boards and sanding.
Sources
- OSHA — Woodworking eTool — OSHA guidance on woodworking hazards, guarding and safe work practices (accessed July 24, 2026)
- American Academy of Ophthalmology — Home workshop eye safety — AAO guidance on protecting your eyes with power and hand tools at home (accessed July 24, 2026)
- The Wood Database — Reference data on species, hardness, workability and movement (accessed July 24, 2026)
Keep reading
Best woodworking tools for beginners
The complete starter kit, ranked, with live prices — the shopping list behind week one of this plan.
See the picksHow much does it cost to start woodworking?
Three starter budgets priced from live retail data, so you know the number before you commit.
See the numbersBeginner woodworking projects
Five first builds, easiest first, each naming the tools and joints it will teach you.
Pick a first projectWoodworking tools you don't need yet
Twelve purchases to delay, and the honest signal that says you are finally ready for each.
Read the guideSet up a garage woodworking shop
Turning a shared garage bay into somewhere you can actually work, without losing the car.
Read the setup guideHow to sharpen chisels
The one skill in week two that makes every other tool on this page work properly.
Learn to sharpen