How to Use a Chisel
Which way the bevel faces, when to push and when to strike, and the three cuts that cover almost everything a beginner needs a chisel for.
How this is funded:we earn a commission if you buy through our links, at no extra cost to you. It never changes which tool we recommend, and we’ll tell you plainly when to skip one. Full disclosure.
A chisel is the most useful tool in a beginner’s kit and the one most likely to sit in a drawer, because nobody explains what to do with it. It looks like it should be obvious and it is not: there is a right way round, a right grip, and a small number of cuts that between them handle almost everything.
Learn those and a chisel becomes the tool you reach for when two parts nearly fit and no machine can close the gap. It cleans a router-cut corner a round bit could not reach, pares a tenon to a snug fit, trims a dowel flush, chops a hinge mortise, and lifts the last sliver off a joint that is a whisker proud. That is why it is on every beginner list.
Before anything else: it has to be sharp
There is no point continuing past this paragraph with a dull chisel. A chisel from the shop is ground, not honed— it arrives with a rough edge and a back that is not flat, and in that state it will crush and tear end grain rather than slice it. Every beginner who concludes they are “bad at chisel work” is usually holding a blunt tool.
Two things have to be true. The back must be flat and polished for the first half inch or so behind the edge, because the back is the reference surface that every accurate cut registers against. And the bevel must be honed to a keen edge. Our how to sharpen chisels guide covers both, cheaply, and the sharpening stone roundup covers the kit. A sharp chisel is also a safer chisel: it goes where you point it, instead of skating off the cut and requiring more force, which is how people get hurt.
Anatomy, in thirty seconds
- The back— the flat side. It is the reference; it never gets a bevel.
- The bevel— the angled face that meets the back at the cutting edge, usually ground around 25 degrees with a slightly steeper honed micro-bevel on it.
- The lands— the side edges. On a bevel-edge bench chisel they are chamfered so the tool fits into the acute corner of a dovetail.
- The handle— wooden or plastic. If it is rated for striking it will say so; if it is not, do not hit it with a mallet.
For a first set, bevel-edge bench chisels in a handful of common widths are the right answer, and the chisels roundup compares five. Everything below assumes that type.
The rule that fixes most mistakes: which way the bevel faces
This single decision explains most of the difference between a clean cut and a scooped one.
Bevel down— bevel against the wood, back facing up — makes the bevel act as a ramp. The cut naturally climbs out of the surface. Use it for removing waste in a hurry: hogging out the bulk of a mortise, or lifting chips out of a recess. It cannot give you a flat bottom, and trying to make it do so is why beginners end up with a dished surface.
Bevel up, back flat on the work is how you get a flat surface. The polished flat back rides on the wood and physically prevents the edge diving below the surface. Use it for paring a joint face, levelling a mortise floor, or trimming a proud plug. This is the default for any cut where accuracy matters.
There is one more position worth knowing: vertical, back against a knifed line, for chopping a shoulder. The flat back registers against the wall of the cut and keeps it dead square — which is exactly how dovetail sockets and mortise walls are defined. See how to cut a dovetail by hand.
What you need
Three items, and a way to hold the work. Note that the mallet and the sharpening guide are not optional extras here — a chisel without either is a tool you will use badly and then stop using.
| Tool | Why you need it | Price |
|---|---|---|
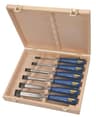 | Six common widths covers almost every beginner cut. Blue-chip steel that hones easily, and handles rated for mallet blows rather than hand pressure only. | $60.99 |
 | Strike a chisel with this, not a steel hammer. The wide beech face spreads the blow and gives you far more control over how hard it lands. | $24.99 |
 | Holds the chisel at a repeatable angle on the stone. The single thing that turns sharpening from a skill you have to learn into a two-minute chore. | $17.99 |
| Starter kit subtotal | $103.97 | |
Live Amazon prices as of September 17, 2026; they change, and we don’t display stale numbers — a tool with no live price shows “Check price” and is left out of the subtotal. #ad How we’re funded.
The fourth thing is work holding, and you almost certainly have it: a clamp, a vise, or a bench dog. Chisel work is one of the few jobs where the workpiece must be held by something other than your hand. The workholding accessories roundup covers bench dogs and stops if your bench has nothing to grip with.
The three cuts that cover almost everything
1. Paring — the controlled slicing cut
Hand power only, no mallet. Grip the handle in your dominant hand; pinch the blade near the edge between the thumb and forefinger of the other, resting that hand on the workpiece so it acts as a brake and a guide. Push forward and very slightly sideways — a slicing motion cuts far more cleanly than a straight shove, because it presents the edge at a shallower angle to the fibres.
Take thin shavings. The instinct is to remove the whole waste in one confident cut; the result is a split that runs below your line, because wood splits along the grain more easily than it cuts across it. Several thin passes are both faster and more accurate than one thick one.
2. Chopping — the struck cut
Mallet in one hand, chisel vertical with the back against a knifed line, and deliberate, metered blows. Chopping removes waste quickly and defines the walls of a mortise or a dovetail socket.
Work from both faces toward the middle rather than driving straight through from one side. Wood splits out where the edge exits, so going all the way through in one direction guarantees a blown-out face on the far side. Stop halfway, flip the piece, and meet in the middle.
Chop the waste in stages: define the line, remove the bulk bevel-down, then come back to the line with a final vertical cut. Trying to hit the line with the first blow pushes the chisel backwards past it — the wedge action drives the tool away from the waste, so the first cut should always stop shy.
3. Cleaning up — the reason you own it
Trimming a dowel or plug flush, levelling a glue line, cleaning the rounded corner a router bit left behind, easing a tenon that is a hair too fat. Bevel up, back flat, light pressure. This is the cut you will make most often and it is the one that makes machine work look hand-made rather than the other way round.
Read the grain, or it will read you
Wood is a bundle of fibres, and a chisel either slices them or levers them apart. Cut “downhill” — in the direction where the grain lines run away from the edge as you advance — and you get a clean surface. Cut uphill and the edge dives under a fibre and tears a chunk out below your line.
If a cut suddenly feels grabby or the surface goes rough, stop and try the same cut from the other direction. That is nearly always the fix, and it takes two seconds. The same principle governs hand planes — see how to use a hand plane.
End grain is a separate case. It cannot be sliced downhill because there is no downhill; it has to be cut with a genuinely sharp edge, a shallow slicing angle, and support behind the exit to stop it crumbling. A scrap block clamped behind the cut solves that.
Safety: the two rules that matter
A sharp chisel is sharper than most knives in a kitchen and is driven with far more force. Two rules cover nearly every injury:
- Both hands stay behind the edge.Never hold the workpiece with the hand in front of the chisel. Clamp the work instead — every time, even for the quick one.
- Nothing you value is in the path of a slip. Cut with the edge travelling away from your body, and assume the tool will travel three or four inches past where you meant it to stop.
Add eye protection when chopping, because chips leave at speed. And keep chisels edge-protected in storage — a chisel rolling loose in a drawer is both a blunt chisel and a hazard when you reach in. See shop safety basics.
A twenty-minute practice session
Take a scrap of softwood, clamp it down, and do these in order. It is a better use of an evening than reading another guide.
- Pare end grain with the bevel up until the surface comes off shiny rather than fuzzy. That shine tells you the edge is sharp and the angle is right.
- Knife a square line across the face and chop straight down to it, back against the line. Look at how square the wall came out.
- Chop a shallow rectangular recess about the size of a hinge — define the perimeter, hog the waste bevel-down, then flatten the floor bevel-up.
- Glue a dowel into a hole, let it set, and pare it flush without leaving a dish around it.
If step one disappoints you, the problem is sharpening, not technique. Go back to how to sharpen chisels, get a genuinely keen edge, and try again — the difference is not subtle.
One safety note. Power tools deserve respect, not fear. Read the manual, keep the guards on, wear ANSI-rated eye protection every time, and never rush a cut. When something feels wrong, stop and reset — there is no deadline in a home shop.
Frequently asked questions
Which way should the bevel face when using a chisel?
Bevel down when you are removing waste and want the cut to climb out of the wood — the bevel acts as a ramp. Bevel up, flat back against the work, when you want a dead-flat surface, because the flat back is the reference that keeps the cut from diving. Most beginner mistakes come from paring bevel-down and then wondering why the surface is scooped.
Do you hit a chisel with a hammer or a mallet?
A mallet, not a steel hammer. A wooden or dead-blow mallet spreads the blow over a wider area and does not mushroom a wooden handle or crack a plastic one. Steel hammers are for steel — and also give you far less control, because the blow is sharper and harder to meter.
Why won't my chisel cut cleanly?
Nine times out of ten it is not sharp. A chisel out of the box is ground, not honed, and needs its back flattened and its edge honed before it will pare end grain. The other common causes are cutting against the grain, which tears rather than slices, and trying to remove too much in one pass.
How do you hold a chisel safely?
Both hands behind the edge and the work clamped, always. One hand grips the handle and drives; the other pinches the blade near the edge to steer and to act as a brake. Never hold the workpiece with the hand that is in front of the chisel — a chisel that slips travels fast and is sharper than most knives in the house.
What is paring versus chopping?
Paring is a controlled, hand-powered slicing cut that takes thin shavings, used for fitting and fine-tuning. Chopping is a struck cut with a mallet that removes waste quickly, used for mortises and dovetail sockets. Almost every chisel job is chopping to get close, then paring to get exact.
Do I need a chisel if I have power tools?
Yes, sooner than you expect. A chisel is the tool that closes the last sixteenth of an inch when two parts nearly fit, pares a proud plug or dowel flush, cleans out a router-cut corner that the round bit could not reach, and cuts hinge mortises. No machine does those jobs.
How often should you sharpen a chisel?
Far more often than beginners expect — a few strokes on a stone every twenty minutes of real use is normal, and it takes less time than putting up with a dull edge. A sharp chisel is also safer, because it goes where you point it instead of skating off the cut and needing more force.
Sources
- OSHA — 1926.301, Hand tools — Paragraph (a): unsafe hand tools must not be issued or used. Paragraph (d): the wooden handles of tools must be kept free of splinters and cracks, and kept tight in the tool — which is the standard behind fitting a handle to a bare rasp tang (accessed August 31, 2026)
- OSHA — Woodworking eTool — OSHA guidance on woodworking hazards, guarding and safe work practices (accessed July 24, 2026)
- American Academy of Ophthalmology — Home workshop eye safety — AAO guidance on protecting your eyes with power and hand tools at home (accessed July 24, 2026)
Keep reading
How to sharpen chisels
The step that makes everything on this page work — flattening the back and honing an edge, cheaply.
Read the sharpening guideBest chisels for beginners
Five sets compared on steel, sizes and value — from the ultra-budget kit to the one most people should just buy.
See the chisel picksHow to cut a dovetail by hand
The classic application of every cut on this page, step by step.
Read the dovetail guideBest mallets for woodworking
Why not a hammer, and which mallet to strike a chisel with.
See the mallet picksWood joints explained
Where chisel work fits in the joints a beginner actually uses.
Read the joints guide