How to Cut a Dado Without a Table Saw
The shelf joint that makes a bookcase strong, cut with a router and a clamped straightedge — plus the two-pass trick for plywood that measures 23/32 instead of 3/4.
How this is funded: we earn a commission if you buy through our links, at no extra cost to you. It never changes which tool we recommend, and we’ll tell you plainly when to skip one. Full disclosure.
A dado is a flat-bottomed slot cut across a board, and it is the joint that turns a stack of shelves into a bookcase. The shelf drops into the slot, which locates it, carries its weight along its whole width, and stops the case racking sideways — all things a row of screws into the end of a shelf does badly.
The internet will tell you to cut one on a table saw with a dado stack. This site assumes you do not own a table saw, for reasons set out in do you need a table saw to start, and the good news is that the router method is not a compromise. A router leaves a flatter bottom than a dado stack does, it will cut a slot in the middle of a 4-foot-wide panel that could never be pushed across a saw, and it cuts stopped dados that a saw blade physically cannot.
The one measurement that decides whether the joint fits
Before anything else: measure the actual piece going into the slot.
Plywood sold as 3/4 inch is very often 23/32, and sometimes thinner than that. That is roughly a thirty-second of an inch of slop — small enough to sound trivial and large enough that the shelf visibly rattles, the glue line gaps, and the joint loses most of the rigidity you cut it for. Nominal lumber sizes have the same problem in a different direction, which how to buy lumber at the home center covers.
Three ways to deal with it, in order of how much they cost:
- Cut the dado in two passes with a smaller bit. Free, and the most accurate method available to anybody: rout against one wall, move the guide, rout against the other, and sneak up on the fit a hair at a time. This is what most of this page is about.
- Buy an undersized plywood bitground to the real thickness of common sheet goods. One bit, one pass, one problem solved — if your plywood matches the bit.
- Make the shelf thinner at its edges by cutting a shallow rabbet on both faces of the end, so a thin tongue fits a narrower dado. More work, and genuinely useful when the slot is already cut.
The depth is less fussy: about a third of the thickness of the board you are cutting into, so roughly 1/4 inch deep in 3/4-inch stock. Deeper buys nothing and weakens the side.
Setting up the cut
Mark both walls, and mark the waste
Square a line across the board from a reference edge, mark the second wall at the measured shelf thickness, and scribble inside the slot. It takes five seconds and it is why you will not rout on the wrong side of your line. A knifed line is better than a pencil one here because the dado wall wants to land in a specific place, not within a millimetre of it — see how to read a tape measure for why.
Offset the guide by the bit-to-base distance
The router does not run on your line; its base runs on the straightedge, and the bit cuts some distance away from the base edge. So: measure from the cutting edge of the bit to the edge of the base, and clamp the straightedge exactly that far from your layout line.
Two cautions that account for most ruined parts. Router bases are not always perfectly concentric with the bit, so mark one spot on the base and keep that spot against the guide for the whole cut — rotating the router mid-cut changes the offset. And check the offset at both ends of the guide before you cut; a straightedge clamped a sixteenth out of parallel produces a tapered dado, which is worse than a wrong one because it fits at one end.
Cut shallow, several times
Set the first pass about an eighth of an inch deep and step down to full depth over three or four passes. Full depth in one go overloads the bit, burns the walls, strains the router and is the single most common cause of the tool kicking sideways out of the cut. A plunge base makes stepping the depth straightforward, which is the main argument for a combination router over a fixed-base one.
Feed direction, which is the safety part
A router bit spins clockwise viewed from above. With the router on top of the work and moving away from you, keep the guide on your left— the bit’s rotation then pushes the base into the straightedge and holds it there. Guide on the wrong side and the same rotation drags the router away from the fence and into your workpiece, instantly. Read how to use a router safely before the first cut; it is not a long page and it is the one that matters.
What to look for in the tools
You need three things, and only one of them is a real purchase.
A router with a plunge base.Dados are the job where plunge capability earns its money: stepping the depth in controlled increments, and starting a stopped dado in the middle of a board rather than at an edge. A fixed-base router will cut dados perfectly well if you set the depth by hand between passes; a palm router will do it in thin material and will struggle in hardwood. If you are buying one router to do everything, the combination kit is the answer — the router roundup compares five.
Straight bits in several diameters,which is what lets you use the two-pass method on any shelf thickness. Double-flute carbide straight bits in a 1/4-inch shank are inexpensive and the right starting point; 1/2-inch shank bits are more rigid and worth having later for deep work. Keep them clean — straight bits pick up resin from plywood glue lines fast, and a gummy bit burns in a way that looks like bad technique.
A straightedge you can clamp,and this is where many people improvise badly. A factory edge off a sheet of plywood is a legitimate guide and costs nothing. A dedicated clamp-on guide is faster, repeatable and stores better, and the same guides that keep a circular saw straight work for a router — the saw guide roundup covers the range. What does not work is a level, a steel rule held by hand, or anything that can flex between the clamps.
| Tool | Why you need it | Price |
|---|---|---|
 | The plunge base is the point: step the depth in controlled passes, and start a stopped dado in the middle of a board. | $230.15 |
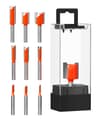 | A range of straight-bit diameters is what makes the two-pass method work on any real shelf thickness, including undersized plywood. | $21.05 |
 | A clamp-on aluminium guide the router base runs against. Breaks into short rails, so it stores on a shelf instead of leaning on a wall. | $79.00 |
 | Two clamps hold the guide, and a third holds the workpiece. Nothing in a router cut should be held by hand. | $32.99 |
| Starter kit subtotal | $363.19 | |
Live Amazon prices as of October 6, 2026; they change, and we don’t display stale numbers — a tool with no live price shows “Check price” and is left out of the subtotal. #ad How we’re funded.
The jig that makes both walls match, every time
Once you have cut a few dados the two-pass method gets tedious, and there is a shop-made jig that removes the tedium permanently. It costs nothing and it is worth an afternoon:
- Screw or glue two straight rails to two cross pieces to make a flat H shape, with the rails set apart by the width of your router base plus the shelf thickness.
- Lay the H over the board with the cross pieces overhanging the edges, and clamp it so the slot between the rails spans where the dado goes.
- Rout against one rail, then against the other, then clear the middle. The two walls are now exactly as far apart as you built the jig, and they will be that far apart on every dado you cut with it.
The refinement that makes it genuinely excellent: cut the jig’s own cross pieces with the router in place the first time you use it, so the slot in the cross piece is itself the layout mark. Line that slot up with your pencil line and the offset arithmetic disappears entirely.
Stopped dados, which is why you own a plunge base
A dado that runs right across the board shows as a slot on the front edge of the case, which looks unfinished on anything but a shop shelf. A stopped dadofinishes short of the front edge so nothing shows, and you cut it by plunging the bit down in the middle of the board, routing to the stop, and lifting out — then squaring the rounded end with a chisel, or notching the front corner of the shelf to match. That final chisel cut is thirty seconds of work and it is the difference between a bookcase and a set of shelves: how to use a chisel covers the cut.
Two honest fallbacks when you have no router
A circular saw and a chisel. Set the blade depth, make the two outer cuts against a clamped guide, make several passes between them to chew out the middle, then flatten the bottom with a chisel held bevel-down. It works, the bottom will never be as flat, and the depth setting is cruder. Technique for the guided cut is in how to cut plywood with a circular saw.
A saw and a chisel, entirely by hand. Knife both walls deeply, saw down each wall to depth with a backsaw against a clamped batten, then pare the waste out from both ends with a chisel working to the knife lines. This is how every dado was cut for several centuries, it is quiet, and on a single shelf it is genuinely competitive on time once you include setup. The hand saw roundup covers the saw.
One closing note on glue. A dado gives you long grain to long grain on the slot walls, which is a strong glue surface — unlike the end-grain joint you get screwing into the end of a shelf. That is most of why the joint is worth cutting, and joinery vs fastening has the independent strength numbers. Put glue on the dado walls, not just the shelf end, clamp it until it grabs, and the case will outlive the screws it replaced. The wood glue roundup covers which bottle.
One safety note. Power tools deserve respect, not fear. Read the manual, keep the guards on, wear ANSI-rated eye protection every time, and never rush a cut. When something feels wrong, stop and reset — there is no deadline in a home shop.
Frequently asked questions
How do you cut a dado without a table saw?
With a router, a straight bit and a straightedge clamped across the board. Mark both walls of the dado, clamp the guide offset from your line by the distance between the bit's cutting edge and the edge of the router base, and cut in three or four shallow passes rather than one deep one. This produces a flatter-bottomed dado than a table saw with a dado stack does, and it works on a board far too wide to push across a saw.
Why doesn't my 3/4 inch shelf fit a 3/4 inch dado?
Because the plywood is not 3/4 inch. Sheet goods are routinely undersized — 23/32 is the common actual thickness for nominal 3/4 — and the difference is enough to leave a visibly sloppy joint. Measure the real piece that is going into the slot, then either buy an undersized plywood dado bit that matches it, or cut the dado in two passes with a smaller bit and sneak up on the fit.
How deep should a dado be?
Between a third and a half of the thickness of the board you are cutting into is the usual range — about 1/4 inch deep in 3/4-inch stock. Deeper does not add useful strength and removes material from the side that has to carry the load; shallower gives the shelf too little to register against. In plywood, stay clear of the far face: there is no extra material to recover if you overshoot.
Can you cut a dado with a circular saw?
You can, and it is a legitimate fallback: set the blade depth, make the two outside cuts against a clamped guide, then make repeated passes between them and clean the bottom flat with a chisel or a router plane. It is slower than a router, the bottom is never as flat, and the depth stop on a circular saw is less precise. It is worth knowing when a router is the tool you do not own yet.
What is the difference between a dado, a groove and a rabbet?
Direction and position. A dado runs across the grain, a groove runs with it, and both are slots in the middle of a face. A rabbet is an L-shaped recess along an edge rather than a slot in the field. All three are cut with the same straight bit and the same technique, which is why one bit set and one guide covers a great deal of casework joinery.
Why is my router burning the wood in a dado?
Usually too slow a feed or too deep a pass. A bit dwelling in one spot scorches the wall, and a full-depth cut forces you to feed slowly because the bit is overloaded. Step the depth down over three or four passes and keep the router moving steadily. A dull or pitch-covered bit also burns — straight bits in plywood pick up resin quickly, and cleaning one often fixes what looks like a technique problem.
Sources
- OSHA — Woodworking eTool — OSHA guidance on woodworking hazards, guarding and safe work practices (accessed July 24, 2026)
- OSHA — 1910.243, Guarding of portable powered tools — Circular saws over 2 in blade diameter need upper and lower guards, and the lower guard must return to covering position automatically when the tool leaves the work (accessed August 19, 2026)
- USDA Forest Products Laboratory — Wood Handbook (FPL-GTR-190) — The U.S. government reference on wood as an engineering material (accessed July 24, 2026)
- Kreg Tool — Straight Edge Guide XL (KMA4700) product page — Box contents: (2) 28 in guide rails, (2) 24 in guide rails, (6) paired connector bars, (2) cutline indicator arms, an adjustable GripMaxx clamp, a handle and the owner's manual. Maximum cutting capacity 8 feet. Kreg's wording: "Your saw rides against the aluminum guide" (accessed September 11, 2026)
Keep reading
Wood joints explained
Where the dado sits among the joints, and why a shelf in a slot beats a shelf on screws.
Read the guideBest router bits for beginners
Straight bits, round-overs and the five bits that cover most of a home shop's work.
See the bit picksHow to use a router safely
Feed direction, depth of cut and the grab that happens instantly — read this first.
Read the safety guideWhat tools do you need to build a bookshelf?
The project this joint exists for — four tools, and you may already own two.
See the tool listBest circular saw guide for beginners
Clamp-on straightedges and guide rails — the same guides that keep a router cutting straight.
See the guide picks