How to Square Up a Board
Face, edge, width, length — the four-square sequence that turns a bowed board into a usable one, by hand, with a circular saw, or with a planer.
How this is funded:we earn a commission if you buy through our links, at no extra cost to you. It never changes which tool we recommend, and we’ll tell you plainly when to skip one. Full disclosure.
Almost every frustrating beginner project traces back to one thing: parts that were not square and straight before assembly began. A carcass racks because its sides were not flat. A glue-up leaves a gap because the mating edges were not straight. A door will not close because the stile was twisted. None of it is a joinery problem, and no amount of clamping fixes it.
“Squaring up” — or four-squaring — is the process that takes a board from however it arrived to six flat surfaces at right angles to each other. It is not glamorous, professional shops spend a serious share of their machine time on it, and it is the single most useful process skill a beginner can learn. The good news: the tools involved are cheap, and you do not need a jointer.
The four-square order, and why it cannot be shuffled
Every step uses the surface produced by the previous step as its reference. Do them out of order and you are measuring from something that is not yet true.
- Flatten one face. This becomes the reference face. Everything else is measured from it.
- Straighten one edge, square to that face. This is the reference edge.
- Bring the second face parallel to the first. This sets thickness.
- Bring the second edge parallel to the first. This sets width.
- Square both ends. This sets length.
Mark the reference face and reference edge as soon as you make them — the traditional marks are a looping squiggle on the face and a caret on the edge pointing at it. It looks fussy and it stops the single most common error in the whole process, which is measuring the third step from the wrong side.
First, read the board
Before you remove any material, work out what is actually wrong with it. Boards deform in four ways and they need different responses:
- Cup— the width curls, so the board sits like a shallow trough. Usually the easiest to remove.
- Bow— the length curves along the face, like a ski. Costs thickness to fix over a long board.
- Crook— the length curves along the edge. Costs width, not thickness, and is often the cheapest defect to fix.
- Twist (wind)— the two ends are in different planes. The one people miss, and the one that ruins assemblies.
Sight along the board end-on and then along each edge; you will see all four faster than you can measure them. Then make the decision that saves the most work: crosscut long boards roughly to length first. A bow that costs you a quarter inch of thickness over 6 feet costs almost nothing over 18 inches, and you are rarely building a 6-foot part anyway.
Also check whether the board has settled. Wood keeps exchanging moisture with the air around it, so a board that was flat in a heated store can move in a garage within a week. Let new stock sit in the space it will be used in before you flatten anything — wood movement explained covers why, and it is the reason a board you squared perfectly can be cupped again by Saturday.
What you need
There are three routes through this and they need different tools, so buy according to the route you are taking. The hand route needs a plane and a way to check your work. The circular-saw route needs a clamped straightedge and does the edges only. The machine route needs a thickness planer, which is a real purchase.
What everyone needs is the checking tool. You cannot flatten what you cannot measure, and a combination square is the cheapest accuracy on this site.
| Tool | Why you need it | Price |
|---|---|---|
 | The no-machine route to a flat face. A No. 4 is short for long stock — fine for parts under about 3 feet, and the reason a longer plane is the usual upgrade. | $28.22 |
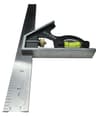 | Registers on the reference face to check the edge is at 90 degrees, and doubles as the straightedge for spotting cup across the width. | $11.63 |
 | The circular-saw route: clamp it on, and the saw gives you a dead-straight edge from a crooked board — then reset it for the parallel edge. | $69.99 |
| Starter kit subtotal | $109.84 | |
Live Amazon prices as of September 17, 2026; they change, and we don’t display stale numbers — a tool with no live price shows “Check price” and is left out of the subtotal. #ad How we’re funded.
Two things not in that table. Winding sticks, because you make them from two offcuts of straight stock about 14 inches long — buying them would be silly. And a thickness planer, which is the machine route and a much larger decision; do you need a planer or jointer is the honest answer for a home shop. If you decide the plane is the route for you, the hand planes roundup covers the range from a $30 starter to the one you keep.
Step 1: flatten the reference face
Put the concaveface up — the one that cups upward like a dish. A concave face rests on its two long edges and sits still. A convex face rocks on its high middle, and anything you do to it simply follows the curve.
By hand, work in three passes. First take the high spots off diagonally across the grain, which removes material fast and does not care about grain direction. Then plane diagonally the other way, so the two sets of cuts cancel each other’s low spots. Finally plane along the length to clean up. Check as you go with the square laid across the width in several places, and with the winding sticks for twist. Stop the moment it is flat — a reference face does not need to be pretty, only true. The technique itself is covered properly in how to use a hand plane, and if the plane is fighting you the cause is almost always a dull iron: how to sharpen a plane iron is the fix.
With a planer, you cannot flatten a face directly — a thickness planer copies the face on the bed rather than truing it, so a bowed board goes in bowed and comes out thinner and still bowed. The workaround is a sled: shim the board on a flat carrier board so it cannot rock, run the assembly through, and the top face comes out flat. Flip it over, remove the sled, and the second pass makes the other face parallel.
And there is the third route, which is not cheating: buy boards that are already surfaced. Home centers sell S4S stock, and a hardwood dealer will surface rough lumber for a small fee. How to buy lumber at the home center covers what to ask for — and note that S4S means surfaced, not straight, so steps 2 and 5 are still yours.
Step 2: straighten one edge, square to that face
This edge has two jobs: to be straight along its length, and to be at 90 degrees to the reference face. Check both, separately — an edge can be beautifully straight and several degrees out of square, which will show up as a wedge-shaped gap in your next glue-up.
By hand:clamp the board on edge and plane along it, checking with the square’s head registered flat on the reference face. Take fuller shavings from the high end until a single shaving runs the full length — that full-length shaving is the signal that the edge is straight.
With a circular saw: clamp a straightedge across the board so the saw cuts just inside the crooked edge, and run the saw along it. You now have a dead-straight edge without touching a plane. This is the same method used for breaking down sheet goods, and how to cut plywood with a circular saw covers the support and blade details that keep the edge clean. Set the saw’s base square to the blade first, or your straight edge will not be a square one.
Steps 3 and 4: thickness and width
These two are the same idea applied to different axes: make the remaining face parallel to the reference face, and the remaining edge parallel to the reference edge.
For thickness, set a marking gauge from the reference face and scribe a line all the way around the board, then plane down to the line. A planer does this automatically, which is genuinely the thing planers are best at — it is why the machine is called a thicknesser.
For width, measure from the reference edge, mark, and rip. A table saw does this in one pass with the reference edge against the fence. A circular saw does it with the guide clamped parallel to the reference edge. A hand rip saw does it with patience.
One rule worth internalising: bring the whole batch to the same dimension in one setting. If six parts should be the same width, rip them all without touching the fence. Parts that differ by a thirty-second of an inch look identical on the bench and produce a carcass that will not go together square — one of the classics in common beginner woodworking mistakes.
Step 5: square the ends
Last, because the ends are the only surfaces that do not need to be referenced from anything except the two faces and edges you have already made. Mark all the way around with a knife and square, then cut just outside the line and pare or plane back to it — or crosscut with a miter saw or a circular saw against a clamped square.
Cut a fraction off the first end before you measure length from it. Board ends from the rack are rarely square and often slightly split from drying, and measuring from an unsquare end propagates the error into every part cut from that board.
How to tell when you are done
Three checks, in this order, and all of them take seconds:
- Across the width: straightedge laid across the board in three or four places, looking for light underneath.
- Along the length: same again, lengthwise.
- For twist:winding sticks at each end, sighted from one end. If the far stick is not parallel to the near one, the board is wound — plane the two diagonally opposite high corners.
Then check the edge against the face with the square, and finish by laying the board on a flat surface and pressing each corner in turn. A board that rocks is not flat, whatever the straightedge said.
A note on standards. A reference face for a shop shelf does not need the same flatness as one for a table top, and chasing perfection on rough stock is how beginners burn a Saturday and lose interest. Flat enough that the joint closes and the assembly sits still is flat enough.
Frequently asked questions
How do you square up a board without a jointer?
Flatten one face first — with a hand plane, or by sliding the board along a flat sled through a thickness planer, or by accepting a home-center board that is already surfaced. Then straighten one edge square to that face, either with a hand plane or by clamping a straightedge and running a circular saw along it. Then bring the second face and second edge parallel, and finally cut both ends square.
What is the four-square process?
The order in which a rough board becomes a usable one: flatten one face, straighten one edge square to it, bring the opposite face parallel (which sets thickness), rip the opposite edge parallel (which sets width), then square both ends (which sets length). Each step uses the surface made in the step before as its reference, which is why the order cannot be shuffled.
Which face should you flatten first?
The concave one — the side that cups upward like a shallow dish. A concave face rests on its two long edges and sits still while you work it. The convex face rocks on its high middle, so anything you do to it just follows the curve. Sight along the board end-on to tell which is which.
Can you square up a board with a circular saw?
You can do the edges with one, not the faces. Clamp a straightedge across the board and run the saw along it and you get a dead-straight ripped edge, then reset the guide for the parallel edge and crosscut the ends square. Flattening a face still needs a plane or a planer — a circular saw only makes straight lines, it cannot remove a twist.
How do I know when a board is actually flat?
Three checks. Lay a straightedge across the width in several places and look for light under it. Do the same along the length. Then check for twist with winding sticks — two identical straight sticks laid across each end, sighted from one end: if the far stick is not parallel to the near one, the board is twisted. Twist is the defect people miss because a board can pass both straightedge checks and still be wound.
Do I need to square up boards from the home center?
Usually only partly. Boards sold as S4S are already surfaced on four sides, so the faces are flat enough for most beginner work — but they are often not straight, because they have moved since they were milled. Expect to straighten an edge and square the ends yourself, and let boards sit in your shop for a week before you build with them.
Is a warped board worth saving?
Sometimes. Cup and bow can usually be planed out if the board is thick enough to lose the material — measure the gap under a straightedge, double it, and see whether the remaining thickness is still usable. Severe twist is rarely worth the fight in a long board. The practical answer is often to crosscut it into shorter pieces first, because a defect that is hopeless over 6 feet is trivial over 18 inches.
Sources
- USDA Forest Products Laboratory — Wood Handbook (FPL-GTR-190) — The U.S. government reference on wood as an engineering material (accessed July 24, 2026)
- The Wood Database — Wood and moisture — How boards take on and give up moisture, and why lumber must acclimate before it is built with (accessed August 19, 2026)
- Wood warping — overview — How and why boards cup, bow and twist as they lose moisture (accessed July 24, 2026)
- OSHA — 1926.301, Hand tools — Paragraph (a): unsafe hand tools must not be issued or used. Paragraph (d): the wooden handles of tools must be kept free of splinters and cracks, and kept tight in the tool — which is the standard behind fitting a handle to a bare rasp tang (accessed August 31, 2026)
Keep reading
How to use a hand plane
Setting the iron, reading shavings, and the technique behind every step on this page.
Read the plane guideDo you need a planer or jointer?
The honest buying answer for a home shop, and what each machine actually does.
Read the comparisonHow to glue up a panel
What squared boards are usually for — edge matching, clamp pressure and flatness.
Read the glue-up guideWood movement explained
Why a board that was flat yesterday is cupped today, and how to stop fighting it.
Read the movement guideHow to buy lumber at the home center
Picking boards that need the least of this in the first place.
Read the lumber guide