Finishing is where good projects go wrong. Five finishes compared on how forgiving they are, how much protection they give, and which one to open first.
You have built the thing. The joints closed, the panel is flat, and now there is a wall of cans with words like polyurethane, tung oil finish, lacquer, shellac and hard wax oil on them, and no explanation of which one will not ruin an afternoon’s work. Finishing is where a large number of first projects are quietly lost — not because the finish was bad, but because it was the wrong kind for someone applying their first one.
Here is what we compare on. How forgiving it is— can a mistake be fixed by applying more, or does it need sanding back? How much protection it actually gives, which is different from how good it looks. Whether it builds a film or soaks in, which decides both durability and repairability. Dry and recoat time, since a finish needing four coats a day apart is a different commitment. Food safety, which matters for boards and utensils. And appearance— specifically whether it adds an amber tint, which is permanent.
Two honest notes before the picks. First: every finish looks better on a well-prepared surface than an expensive finish does on a poor one. Read our sanding and grits guide before you open a can. Second: test on an offcut of the same wood, from the same board, sanded the same way. Every species takes finish differently and the offcut costs nothing.
How this is funded: we earn a commission if you buy through our links, at no extra cost to you. It never changes which tool we recommend, and we’ll tell you plainly when to skip one. Full disclosure.
Quick picks
Ranked on the specs that matter for a beginner and honest buyer fit. Select a row to jump to the full write-up. We haven’t hands-on-tested these — here is exactly what we do instead.
The most forgiving finish a beginner can use. Wipe it on, wait, wipe it off — there are no brush marks to leave, no runs to sand out, and a mistake is fixed by applying more. It is the finish that teaches you that finishing is not scary.
Real polyurethane protection with none of the brush anxiety. Because it is thinned for wiping, each coat is thin enough that dust nibs and runs mostly cannot happen — you just build three or four coats instead of two.
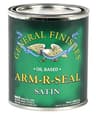
General Finishes Arm-R-Seal Oil Based Topcoat, Satin, 1 Quart
The finish serious hobbyists standardize on. It wipes on like the cheaper products, cures harder than most of them, and levels beautifully — the reason it appears on so many tabletops that get real use.
Howard Products Butcher Block Conditioner, Food Grade Mineral Oil and Wax
For cutting boards, spoons and anything that touches food. Mineral oil with wax does not cure into a film, so it never flakes into the food — it just has to be reapplied when the board looks dry.
The lowest-effort finish there is, and the thing you put over other finishes to make them feel right. Wax adds a soft sheen and a slick hand-feel in about ten minutes of work, on almost anything.
The most forgiving finish a beginner can use. Wipe it on, wait, wipe it off — there are no brush marks to leave, no runs to sand out, and a mistake is fixed by applying more. It is the finish that teaches you that finishing is not scary.
Strengths
+Wipe-on, wipe-off — no brush technique to learn
+Blends into itself, so repairs and touch-ups are invisible
+Brings out grain and color more than any film finish does
Trade-offs
−Minimal surface protection — it soaks in rather than building a film
−Rags soaked in it are a genuine fire hazard until dried flat
Type
Penetrating oil finish
In the set
Single tool
Material / build
Oil and varnish blend
Key spec
1 quart, natural
Best for
Best overall for a first finish
Worth knowing. Oil-finish rags can self-heat as the oil cures and have caused fires. Spread used rags flat outdoors to dry completely, or submerge them in water in a sealed metal container — never leave them balled up in a bin.
Specs read from the product listing, on August 11, 2026. “Not listed” means the listing doesn’t state that figure.
Real polyurethane protection with none of the brush anxiety. Because it is thinned for wiping, each coat is thin enough that dust nibs and runs mostly cannot happen — you just build three or four coats instead of two.
Strengths
+Genuine film protection against water rings and wear
+Wiping avoids the brush marks that ruin most first poly jobs
+Satin sheen hides small imperfections better than gloss
Trade-offs
−Needs three or more coats, with drying time between each
−Oil-based poly adds a permanent warm amber tint
Type
Wipe-on polyurethane
In the set
Single tool
Material / build
Oil-based polyurethane
Key spec
1 pint, satin
Best for
Best durable finish for a beginner
Worth knowing. The amber tint is not a flaw, it is chemistry — oil-based finishes yellow as they cure and continue to warm over years. On walnut it is lovely; on pale maple, use the water-based version instead.
Specs read from the product listing, on August 11, 2026. “Not listed” means the listing doesn’t state that figure.
#3Best premium topcoat
General Finishes Arm-R-Seal Oil Based Topcoat, Satin, 1 Quart
The finish serious hobbyists standardize on. It wipes on like the cheaper products, cures harder than most of them, and levels beautifully — the reason it appears on so many tabletops that get real use.
Strengths
+Cures notably harder than hardware-store wipe-on poly
+Levels out to a very even surface without brush work
+Widely regarded as forgiving despite the professional reputation
Trade-offs
−Twice the price of the supermarket equivalent
−Long recoat times — this is a weekend finish, not an evening one
Type
Wipe-on oil-based urethane topcoat
In the set
Single tool
Material / build
Oil-based urethane
Key spec
1 quart, satin
Best for
Best premium wipe-on topcoat
Worth knowing. Store wipe-on finishes upside down or squeeze the air out of the can. Oil-based products skin over from oxygen contact, and half a wasted quart costs more than the trick saves.
Specs read from the product listing, on August 11, 2026. “Not listed” means the listing doesn’t state that figure.
#4Best for food contact
Howard Products Butcher Block Conditioner, Food Grade Mineral Oil and Wax
For cutting boards, spoons and anything that touches food. Mineral oil with wax does not cure into a film, so it never flakes into the food — it just has to be reapplied when the board looks dry.
Strengths
+Food-grade and non-drying, so nothing can chip off into food
+Immediately restores a gray, dried-out board
+Wax content sheds water better than plain mineral oil
Trade-offs
−Never cures — it must be reapplied every few weeks with use
−No protection against wear or scratches at all
Type
Food-safe board conditioner
In the set
Single tool
Material / build
Food-grade mineral oil and wax
Key spec
Non-drying, food contact safe
Best for
Best for cutting boards and food contact
Worth knowing. Cutting boards are the one place a film finish is wrong. Poly on a board will be cut through by the first knife and then peel in flakes — a penetrating oil is the only sane choice for a working board.
Specs read from the product listing, on August 11, 2026. “Not listed” means the listing doesn’t state that figure.
#5Best low-effort sheen
Minwax Paste Finishing Wax, Natural, 1 lb
The lowest-effort finish there is, and the thing you put over other finishes to make them feel right. Wax adds a soft sheen and a slick hand-feel in about ten minutes of work, on almost anything.
Strengths
+Fastest visible improvement of any product here
+Goes over bare wood, oil or cured poly equally well
+One tin lasts years — also protects hand-tool steel from rust
Trade-offs
−Almost no protection against water or wear on its own
−Needs reapplying periodically as it wears off
Type
Paste finishing wax
In the set
Single tool
Material / build
Blended waxes in solvent
Key spec
1 lb tin, natural
Best for
Best low-effort sheen and top-of-finish polish
Worth knowing. Wax on a plane sole or a saw plate cuts friction dramatically and keeps rust off hand tools between sessions. Half a tin usually ends up doing tool maintenance rather than finishing.
Specs read from the product listing, on August 11, 2026. “Not listed” means the listing doesn’t state that figure.
The two families of finish
Almost everything on the shelf is one of two things, and understanding the split makes the whole aisle legible.
Penetrating finishes (oils)
These soak into the wood and cure inside it. They leave little or no film on the surface. Danish oil, tung oil finishes, boiled linseed oil, and board conditioners are all in this family.
Pros:very forgiving to apply, beautiful grain enhancement, and completely repairable — you can re-oil a worn spot and it blends invisibly, because there is no film edge to feather. Cons: modest protection against water rings, heat and abrasion, and they need reapplying over the years.
If you are choosing between the two most-asked products specifically, Danish oil vs polyurethane puts them side by side on protection, repairability, coats and rag safety — and explains why a wipe-on poly is the answer for most readers who want both.
Film finishes (varnish, polyurethane, shellac, lacquer)
These cure into a layer that sits on top of the wood. That layer, not the wood, takes the wear.
Pros: real protection against water, heat and scratching, and a durable surface for tables and anything that gets used hard. Cons: much less forgiving. Runs, brush marks, dust nibs and orange-peel texture are all possible, and repairing a damaged film usually means sanding an area back and recoating it.
The best of both for a beginner is a wipe-on polyurethane: a film finish thinned enough to apply with a cloth, so each coat is too thin to run or show brush marks. You build three or four coats instead of two, and it is dramatically harder to ruin.
Which finish for which project
A first box, shelf or small project: Danish oil. Fast, forgiving, and the grain will look better than you expected.
A tabletop, desk or anything with drinks on it: wipe-on polyurethane, three to four coats. This is the case where film protection genuinely matters.
A cutting board, spoon or bowl:food-grade mineral oil and wax, reapplied when the board looks dry. Never a film finish — a knife will cut through it and it will peel in flakes.
Shop furniture and jigs: paste wax, or nothing at all. Do not spend a weekend finishing a sawhorse.
Outdoor projects: an exterior-rated finish, and expect to reapply annually. No interior finish survives UV and rain.
Oil-based or water-based?
Oil-based finishes add a warm amber tint that deepens over the years. On walnut, cherry and oak this is usually lovely. On pale maple, ash or painted work it can be unwelcome, and it is permanent.
Water-based finishes dry clear and stay clear, dry much faster, and clean up with water. They also raise the wood grain on the first coat — water swells the fibers — so you sand lightly after coat one and it behaves from then on.
Simple rule: oil-based for warm woods, water-based for pale woods. Our wood species guide covers which is which.
The application routine that works
Sand to the right grit — and no further. 150 to 180 for oil finishes, 180 to 220 before a film finish. Sanding higher closes the pores and the finish absorbs less evenly, not more.
Remove all dried glue. Glue seals the wood, and every spot of it shows as a pale patch. Check with raking light— a lamp shone across the surface reveals what overhead light hides. See our wood glue guide.
Vacuum, then wipe with a slightly damp cloth and let it dry. Dust on the surface becomes dust in the finish.
Test on an offcut from the same board, sanded the same way. Non-negotiable if you are staining.
Apply thin coats.Every finishing problem a beginner has — runs, wrinkles, tackiness, a surface that never hardens — traces back to applying too much at once.
Respect the recoat window on the can. Too soon and the solvent in the new coat softens the old one; much too late and adhesion suffers without a light scuff sand.
Scuff lightly between coats with 320 grit to knock down dust nibs, then wipe clean.
Blotching, and how to avoid it
Pine, maple, cherry and birch absorb stain unevenly, producing dark splotches that no amount of extra coats will even out. It is the most common finishing disaster and it is entirely preventable.
Three defenses. Use a pre-stain conditioner, which partially seals the thirsty areas before the stain arrives. Use a dyerather than a pigment stain, since dyes color more evenly. Or — simplest and often best — skip stain entirelyand let a clear oil finish bring out the wood’s own color. Most beginners who stain are trying to make cheap pine look like walnut, and it very rarely works.
If you have decided you genuinely do want color — a piece that has to match a room, or a bookcase you want darker — our wood stain roundup ranks the conditioners, penetrating stains and gel stains on exactly that problem, with each manufacturer’s own published dry times.
The safety part you should not skip
Rags soaked in oil finishes can self-heat as the oil cures and have caused fires. This is not folklore — OSHA’s spray finishing standard explicitly requires rags impregnated with finishing material to go into approved metal waste cans immediately after use.
In a home shop: spread used rags flat outdoors on a non-combustible surface until they are completely dry and stiff, or submerge them in water in a sealed metal container. Never leave them balled up in a bin, in a pocket, or draped over the edge of a bench overnight.
Ventilate as well. Solvent-based finishes give off vapors you should not be breathing in a closed garage — open the door, and wear a cartridge respirator for anything sprayed. See our safety gear guide.
Frequently asked questions
What is the easiest wood finish for a beginner?+
A wipe-on oil finish such as Danish oil. You wipe it on, let it soak, and wipe off the excess — there are no brush marks, no runs and no dust nibs, and mistakes are fixed by applying more rather than sanding back. It gives less protection than a film finish, which is a fair trade for a first project.
What finish is safe for cutting boards?+
Food-grade mineral oil, usually blended with a wax as a butcher block conditioner. It never cures into a film, so nothing can flake into food, and it is reapplied whenever the board looks dry. Do not use polyurethane or any film finish on a working board — a knife cuts through it and it peels.
How many coats of finish do I need?+
Two to three for a wipe-on oil, three to four for a wipe-on polyurethane, and more on surfaces that take real wear like a tabletop. Thin coats are always better than thick ones: almost every beginner finishing problem — runs, wrinkles, a surface that stays tacky — comes from applying too much at once.
Why did my stain come out blotchy?+
Because species like pine, maple, cherry and birch absorb stain unevenly. Use a pre-stain conditioner to partially seal the thirsty areas, switch to a dye instead of a pigment stain, or skip stain and use a clear oil finish — which is usually the better-looking answer anyway.
Are oily rags really a fire risk?+
Yes. Oil finishes cure by oxidation, which generates heat, and a balled-up rag holds that heat in — enough to ignite. OSHA's spray finishing standard requires rags impregnated with finishing material to go straight into approved metal waste cans. At home, spread them flat outdoors until fully dry, or submerge them in water in a sealed metal container.