How to Fill Gaps in Wood Joints
Which fills disappear, which ones shout, and the uncomfortable truth that the best fix for most gaps is to close the joint instead of filling it.
How this is funded: we earn a commission if you buy through our links, at no extra cost to you. It never changes which tool we recommend, and we’ll tell you plainly when to skip one. Full disclosure.
The best way to fill a small gap in a wood joint is with sawdust from the same board mixed into wood glue — it matches the color because it isthe wood — and the best way to fill a gap bigger than about a sixteenth of an inch is not to fill it, but to glue in a thin wedge cut from the same species and trim it flush. That is the practical answer, and it is what most experienced woodworkers actually do.
The less welcome answer, which belongs at the top of the page rather than buried: a gap is information. It is telling you that two surfaces are not touching, and before you decide how to hide that, it is worth thirty seconds working out why. Three gaps that look identical have three different fixes:
- A gap from a bad cut or a bad fit. The faces were never going to meet. Filling is cosmetic; the joint is as strong as the glue line that did make contact.
- A gap from clamping.The faces would meet under pressure and did not get it — not enough clamps, uneven pressure, or a clamp pulling the joint out of line. Often fixable before the glue cures.
- A gap from wood movement. It appeared weeks later, and it will close again in summer. This one must not be filled rigidly, and that is the single most important sentence in this guide.
Fix it before you fill it
Two windows exist where the gap can still be made to go away properly, and both close quickly.
While the glue is still wet
If you spot the gap during a glue-up, add a clamp directly across it and look again. Titebond’s own glossary defines clamp time as the period required for a joint to gain enough strength to come out of the clamps with no decrease in long-term strength — so until that time is up, the joint is still movable. Their FAQ puts that at thirty minutes to an hour for an unstressed joint and 24 hours for a stressed one. A gap closed in the first ten minutes never existed.
If the glue has begun to skin over, stop. Their glossary’s term for the underlying problem is open assembly time — the period when the adhesive film is exposed to the air — and a skinned-over film makes a joint that looks closed and is not bonded. Take it apart, clean it, and start again with fresh glue.
While the joint is still dry-fitted
This is the real answer and the one beginners skip: dry-fit every joint before glue touches it, find the gap then, and pare the high spot away with a chisel until the faces meet. A sharp chisel removing two shavings is a thirty-second fix. The same gap after glue-up is a repair you will be able to find for the rest of the piece’s life.
See how to use a chisel for the paring technique, and how to square up a boardfor the cause behind most ill-fitting joints — faces that were not flat or square before the joint was cut.
The four fills, from invisible to obvious
1. Sawdust and glue slurry — hairline to small gaps
Collect fine dust from sanding the same board— not shop-floor sweepings, which are a mix of species and will read as a gray smudge. Mix it with wood glue to a stiff paste, press it into the gap with a putty knife or your thumb, and mound it slightly proud so you can level it later.
Why it works: the filler is the same wood, so the color is right by construction. Why it is not perfect: the glue seals the fibers, so the repair takes stain differently from the surrounding wood — usually lighter. On a clear-finished or oiled piece it can genuinely disappear; under stain, test it first.
2. Thick gap-filling glue — up to about 1/16 inch
Ordinary PVA is mostly water, so it shrinks as it dries and leaves a dished line where you wanted a fill. A purpose-thickened glue does not. Titebond publishes a viscosity of 36,500 cps for Quick & Thick and states on its own product page that it fills small gaps, with an open assembly time of 3 to 5 minutes, a total assembly time of 10 to 15 minutes at 70°F and 50% relative humidity, an application temperature above 50°F, and a dried film that dries clear. The same page states plainly that it is not recommended for exterior use or where moisture is likely — so this is an interior repair.
For comparison, Titebond Original’s own page gives an open assembly time of 4 to 6 minutes and a translucent dried film, and does not claim gap filling. That difference is the whole reason a thick glue exists.
3. A wedge or shim of the same wood — anything bigger
Above roughly a sixteenth of an inch, filler stops being a repair and starts being the joint. The correct fix is to make the gap into a smaller piece of wood: plane or knife a thin wedge from an offcut of the same board, apply glue, tap it in, and let it cure before trimming flush with a chisel or a block plane.
Done with attention to grain direction, this is close to invisible — and unlike filler, it is actually wood, so it moves with the piece and takes finish like the piece. Furniture makers have repaired joints this way for centuries because nothing else works as well.
4. Commercial wood filler — painted work and nail holes
Filler out of a tub has one unambiguous home: anything that will be painted. Under paint, color match does not matter, it sands beautifully flat, and it is the right product for brad holes and small defects. Under stain or a clear finish it is the least reliable option on this list, because it either refuses stain and stays pale or drinks it and goes dark.
If the piece will be painted, fill freely and stop worrying — the paint makes this problem go away entirely.
Which tub, and the manufacturers’ own published limits on depth and dry time, are in the best wood filler for woodworking — including the distinction that trips most people up, which is that wood putty never hardens and belongs on a finished surface rather than under one.
What to use, and what each thing is for
Three of the four picks below are for preventing the gap rather than filling it, which reflects where the leverage actually is. Nothing here is a specialty repair product.
| Tool | Why you need it | Price |
|---|---|---|
 | A thickened PVA that fills small gaps instead of shrinking into them. Titebond's own page: 36,500 cps, 3-5 minute open time, dries clear, interior use only. | $8.15 |
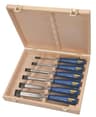 | The tool that closes the gap instead of hiding it — pare the high spot at the dry fit, and trim a glued-in wedge flush afterwards. | $69.99 |
 | Most gaps at glue-up are a pressure problem. A 36 in bar clamp across the joint is the fix available during the first thirty minutes. | $21.99 |
 | Where the slurry comes from: fine sanding dust off the same board, which is the only filler that matches the color for free. | $21.16 |
| Starter kit subtotal | $121.29 | |
Live Amazon prices as of October 21, 2026; they change, and we don’t display stale numbers — a tool with no live price shows “Check price” and is left out of the subtotal. #ad How we’re funded.
The four times you should not fill at all
1. When the gap moves with the seasons. Wood takes on and gives up moisture and changes dimension across the grain as it does. A joint that gaps in winter and closes in summer is working correctly, and a rigid filler will either be squeezed out or will crack the joint around it. Breadboard ends, wide panels in frames and tabletops fastened across the grain all rely on that movement. The explainer is here, and it is worth reading before you fill anything on a tabletop.
2. When the joint carries load and the faces are not touching. A filled gap has the strength of the filler, which is not the strength of a glue line between two mating surfaces. On a chair leg, a bed rail or a shelf bracket, remake the joint.
3. When the gap is wide enough to be visible as a repair.A 1/8 inch line of filler on a show face reads instantly as a mistake that was covered up. A wedge of the same wood reads as wood. Beyond that, remake the part — it is usually one board.
4. When you are about to stain and have not tested. Filling then staining is where a decent repair becomes an obvious one, because fillers and slurries almost never take stain the way bare wood does. Put the same repair on a scrap, stain the scrap, and decide from that.
Levelling the repair without tearing it out
Wait for a full cure, not for “dry to the touch”. Titebond’s FAQ advice for a clamped joint is thirty minutes to an hour under pressure and no stressing the new joint for at least 24 hours — and a filled gap is a thin, unsupported section of adhesive, so it deserves the longer end of that. Sanding a soft repair drags it out of the gap and smears it across the grain around it, which turns a 2 mm problem into a 20 mm one.
Then level it with the least aggressive tool that will do it. A sharp chisel held flat, or a card scraper, removes a proud repair without touching the wood either side. A random orbit sander does the opposite — it dishes the softer repair and rounds the edges of the joint. See how to use a card scraper and how to sand wood properly.
Finally, look at it in raking light before you finish — a lamp set low and shone almost parallel across the surface throws a shadow off every proud or dished patch. It is the same check that catches sanding scratches, and it is the last chance to find a repair before the finish makes it permanent.
Frequently asked questions
What is the best way to fill a gap in a wood joint?
For hairline and small gaps, a slurry of fine sanding dust from the same board mixed with wood glue — it matches the color because it is the same wood. For gaps up to roughly a sixteenth of an inch, a thickened gap-filling wood glue does the job in one step. Above that, glue in a thin wedge or shim cut from the same species rather than filling.
Does wood filler take stain?
Rarely well. Most fillers either refuse stain and stay pale, or soak it up and go darker than the surrounding wood, and glue-bound sawdust slurries seal the fibers so they take less stain than bare wood. The reliable approach is to test your finish on a scrap carrying the same repair before you touch the real piece — and where possible, stain or finish first and fill afterwards with a color-matched product.
Can wood glue fill a gap?
Thin PVA glue cannot — it shrinks as the water leaves and leaves a dished line. A purpose-made thick glue can: Titebond's own page for Quick & Thick states it fills small gaps, with a viscosity of 36,500 cps, an open assembly time of 3 to 5 minutes and a total assembly time of 10 to 15 minutes at 70 degrees F. The same page states it is not recommended for exterior use or where moisture is likely.
Why did my joint have a gap when I glued it up?
Most often the joint faces were not flat or square to begin with, so clamping pressure could only close part of the joint. Other common causes: not enough clamps or uneven pressure, running out of open assembly time so the glue skinned over before the parts came together, and gluing wood that has not acclimated to the shop, which then moves after assembly.
Should I fill a gap or redo the joint?
Redo it if the joint carries load and the gap means the faces are not touching, if it is a show surface on a piece you care about, or if the gap is wide enough that a filler would be the structure rather than the wood. Fill it if the gap is cosmetic, small, and the joint is otherwise sound. A gap that reopens every winter is wood movement and should not be filled rigidly at all.
Sources
- Titebond — Titebond Quick & Thick Multi-Surface Glue product page — Application temperature above 50°F; open assembly time 3-5 minutes and total assembly time 10-15 minutes at 70°F/50% RH; viscosity 36,500 cps; dries clear; fills small gaps; for wood, pottery, ceramic, stone, glass, fabric and leather. "Not recommended for exterior use or where moisture is likely" — interior projects only. Item 2404 is the 16 oz bottle (accessed September 18, 2026)
- Titebond — Titebond Original Wood Glue product page — Aliphatic resin emulsion. Application temperature above 50°F; open assembly time 4-6 minutes and total assembly time 10-15 minutes at 70°F/50% RH; dried film translucent; bond strength 3,600 psi on hard maple. "Not recommended for exterior use or where moisture is likely", and no food-contact approval is stated. Item 5064 is the 16 oz bottle (accessed September 18, 2026)
- Titebond — Frequently asked questions — Clamping: "we recommend clamping an unstressed joint for thirty minutes to an hour. Stressed joints need to be clamped for 24 hours", and "not stressing the new joint for at least 24 hours". Shelf life stated as two years, with Original and II usually usable beyond it; thickened glue is restored by shaking. Titebond III and Titebond II "have both been approved for indirect food contact" and are the glues recommended for cutting boards. Oily species such as teak, cedar and redwood should be planed, jointed or sanded shortly before gluing (accessed September 18, 2026)
- Titebond — Glossary of adhesive terms — Chalking: "Chalky white appearance of a layer of glue which has dried too cold. A glue which dries below this critical 'chalk point' does not knit together properly and the resulting bond is likely to fail." Open assembly time: "Period of assembly time when the adhesive film is exposed to the air." Clamp time: "The period of time required for a joint to gain enough strength to permit it to be removed from pressure with no decrease in long-term strength" (accessed September 18, 2026)
- The Wood Database — Dimensional shrinkage — How wood moves with moisture — the cause of most beginner joint failures (accessed July 24, 2026)
Keep reading
Common beginner woodworking mistakes
The full survey — cumulative error, reference faces, and the habits that stop gaps appearing at all.
Read the guideWood glue explained
Open time, clamp time, cure time and squeeze-out — the vocabulary behind every gap in this guide.
Read the glue guideHow to glue up a panel
Jointing edges, clamping sequence and the dry run that prevents the gap in the first place.
Read the methodWood movement explained
Why some gaps open and close with the seasons, and why those must never be filled rigidly.
Read the explainer